Wiibrew
find my old guide at Wii Homebrew in Brief
i write in mid-december 2024, having spent the past month programming for the wii and learning about its hardware and hacking history in more depth. i’ve had a guide up for almost 5 years teaching users of wii homebrew some basics, but i fancied writing something deeper, cos i like having cool things to get lost in on my website. it’ll be in chapters, some of which may be useful depth to add to my old (rather dull) guide, and others that’ll be history, lore, ethics and compsci shit. the multi-dimensional stuff i often write y’kno
1. twiizers
it serves well to remember, when looking at the wii today, which may as well be a fully open system, so banged up is its security… there was a time when it functioned as a hardware security module, a black box that nobody could hack into. it had a cryptic “magic layer” of security, which turned out to be a secret second processor chip buried in the gpu, that was abstracted away and invisible to even the game devs
the pioneers of wii hacking, team twiizers, left behind a couple of talks at the chaos communication congress that take us right back to that feeling
- the state of the wii (2007/12/28)
- wii fail (2008/12/28)
the first of these is 5 minutes long, made a few hours after the first unsigned code ran on the wii. the second is an hour and is the one i recommend watching to take you thru these first two chapters. it’s good to watch the characters of the story in the flesh – bushing and marcan present the talk, with segher and tmbinc collaborating with them on the hacking
the first hack, from december 2007, was the tweezer attack (YEP). the pattern is quite typical i think, that a system that’s backwards-compatible (with the gamecube) has to, in some sense, be backwards-compatible with its lack of security. the wii was nintendo’s first console to use software security (cryptography). as such, to run gamecube games, it locked down the wii’s hardware to work exactly like a gamecube – a sandbox. and sandbox escaping, for malware say, is about one of the oldest tricks in the book
hackers were already able to use existing modchips for gamecube disc drives with minimal new effort, so they could run homebrew in gamecube mode. the gamecube had 24MiB of general ram + 16MiB of audio ram; the wii maintained this compatibility by splitting its 88MiB of ram into a 24MiB chip (MEM1) and a 64MiB one (MEM2), whose lowest 16 were assigned to the audio ram. so the tweezers bridged parts of this chip, so that the cpu in gamecube mode saw a 16MiB window that could be shifted along MEM2. a program was written to dump this thru the memory-card interface
… and then it turned out “nintendo” didn’t bother to clear out the non-sandboxed part of MEM2 when entering gamecube mode, part of which was being used by the security processor’s os
… and they just left a bunch of secret encryption keys sitting in that os’s image, without any encryption or obfuscation
the talk details the many different high-security hardware locations these keys were burned into, and the total lack of a conceivable reason to store copies of them in firmware… that fails to be cleared from ram so it can be tweezed out of the sandbox
well well. with the common public key used to decrypt titles (images of games and firmware) now to hand, all software was available unencrypted, so let the reverse engineering begin!
✲✲✲
hackers of locked-down consumer systems usually work across an array of them, and bushing was known at the time for early jailbreaking as part of iphone dev team. after his death from a health incident in 2016, it was figured out that he’d been working for apple 😮. a senior embedded security engineer. nobody knows how he exploited his double agency, but i find that such a cool story. those who take a cursory browse of the wiki that team twiizers ran are greeted with his obituary, so i’m glad to put a bit of a story to his name and face here
2. programa trucha: anatomy of an exploit
the tweezer attack took place sometime in very late 2007, and the first homebrew ran at the conference on 28th dec. the wii common key allowed the os of the security processor, known as IOS, to be analysed, as well as wii games
the first exploit found, found by segher, which the demo ran, was interesting in that it was so obvious and easy to fix that segher correctly predicted publishing it would be completely pointless. this cuts both ways: it was independently rediscovered two months later, so hiding it didn’t buy much time
when an exploit is “obvious”, like say the famous apple ssl bug…
    if ((err = SSLHashSHA1.update(&hashCtx, &signedParams)) != 0)
        goto fail;
        goto fail;
(the bug here is to do with c syntax; the first goto fail attaches to the if statement, but the second one always runs, and was left over by a bad copy+paste… i mean, i think most people can spot there shouldn’t be two goto fails haha)
… then it’s glaring to any intermediate programmer who can see the source code. but you have to reverse-engineer it to get to that point, and that’s a tuff and imperfect process. in practice, it means it takes a few months, but you still end up with several people independently discovering it
“nintendo”’s first-exploited bug actually manages to somehow be much worse than apple’s. marcan explains it at the talk above. titles (software including IOS and every game) come with a title metadata (TMD) file, which has a (SHA1) hash of every content file, and is then hashed itself. the hash has some constant, called padding, prepended to it, and is then (RSA) encrypted with nintendo’s private key, and decrypted by the common key every wii (and, indeed, we) now have
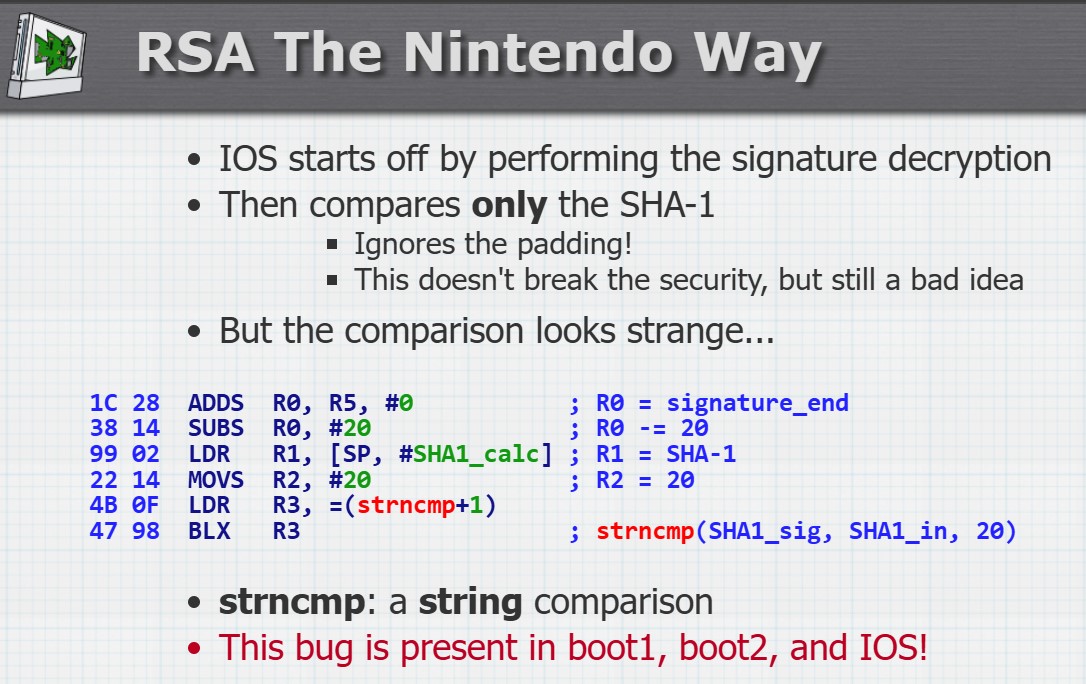
here’s the slide from the talk. yeah, so… we fake-sign our software with a completely zero signature. rsa encrypts and decrypts zero to zero, so we need neither the private nor public key. “nintendo” signs the hash without the padding, so we only need the TMD hash to be zero. all of that’s still useless to us, cos getting something to hash to something else is impossible; that’s the point of a crypto hash. unless…
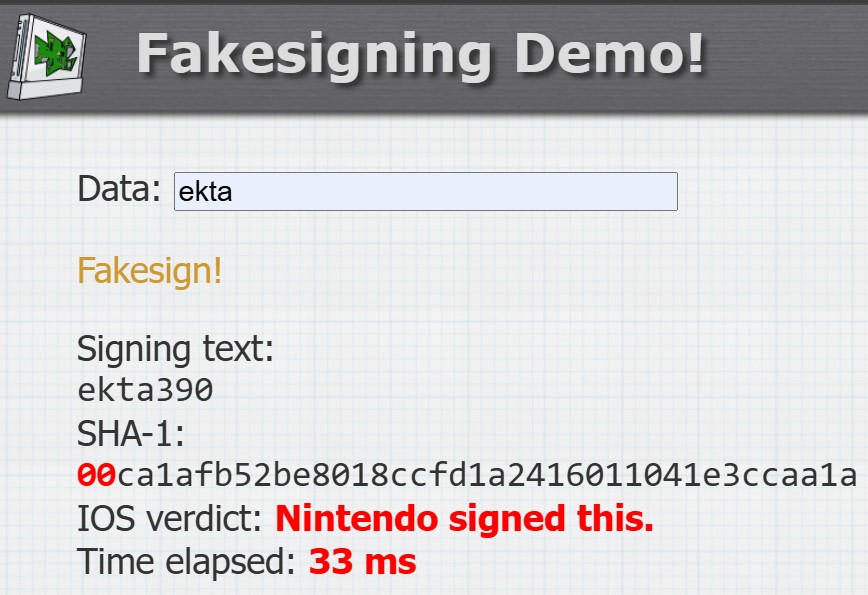
unless the function that verifies (binary) hashes is strncmp, a string comparison that terminates on the first null byte. (in c, a null byte marks the end of a string, so anything following it doesn’t change the string)
so we just fiddle an unused part of the TMD until the TMD’s hash starts with a null byte. a byte has 256 options, so in practice it takes between 1 and 2000ish attempts to fake-sign a TMD. a few milliseconds :). i’ve seen this code myself in every homebrew that installs things ever
even without the padding error, it wouldn’t take a huge brute-force attack to fake-sign a title, since there are inevitably signatures in official nintendo TMDs that decrypt to a TMD hash that has a zero early-on. but the padding error makes the fake-signing process trivial and instant, and we don’t even need the common key or to run rsa for it
this slide makes me crease. the slideshow is up on marcan’s website. the bug is known as the signing bug, or trucha, meaning fake (literally trout) in spanish. and it affects boot1 – an unmodifiable bootloader on the wii’s flash storage that is hash-verified by a bootrom (“boot0”) in the security processor and so can’t be fixed. it can be made to load anything. oof
boot1 was finally fixed at the factory in very late 2008, after 2 years of wiis that can have anything (like team twiizers’ recovery utility bootmii) installed as boot2, the thing boot1 tries to load. it’s similar in that way to fusée gelée, the switch exploit in the (stock nvidia) cpu’s built-in bootrom recovery mode, which can be triggered by entering recovery mode by bridging some pins in the right joycon rail with a jig, and then connecting the switch to a pc and sending in a payload. the bug is another obvious one, again discovered by several people at the same time, and is that the recovery mode program, when it allocates a memory buffer to create a response to the pc’s request, allocates the size the pc requests without bounds-checking, and so smashes its stack
again, it does this for some commands but not all. again, as with all 3 exploits discussed, it’s spotted and fixed 10 times out of 10 in a code review. again, the first 1.5 years of switch consoles are vulnerable and cannot be patched 🚀🧊
to be fair to the wii, the mistake made in the ps3’s crypto was arguably worse… here’s team twiizers again to take you thru it :)
3. broadon: available at walgreen’s
if you’ve been paying attention, you may have noticed a couple of things. firstly, trucha is a bit different from the apple bug and fusée gelée. both of those were oversights. is trucha really an oversight?
as marcan said in the presentation, the padding error shows they didn’t know what they were doing with the rsa algorithm. the leftover pasted statement and the wrong size being passed to the allocated buffer are mistakes, which is what code review is for. but the use of a string comparison to verify a hash is, like, not something anyone would do unless ey didn’t grasp basics of c programming
the presentation is subtitled “is implementation the enemy of design”. the design is actually wonderfully elaborate, as i’ll get into in chapter 5, but, well,
the second clue i dropped is that i put “nintendo” in quotes when talking about these mistakes. cos they weren’t due to them, but to a contractor called “BroadOn”. a company that’d been founded in 2000, and since then designed the n64 iQue, as well as IOS (and all bootloaders) and the chip it runs on. the entire signature system came from them. it was them wot did trucha
a company founded in 2000… because it was by a guy who worked for a contractor that produced the n64’s gpu. it went thru 3 shitty names before being acquired by acer and removed from nintendo forever
it sounds like a bootleg of broadcom lol (mind you, broadcom’s wii bluetooth stack is responsible for a massive exploit found in 2019). a collab between nintendo in japan and broadon in the usa, in a time when collab meant emails and flying out to do a powerpoint preso occasionally, resulted in this mess. the decision to reimplement an entire secure operating system from scratch, meaning known bugs can’t be imported from a similar os, yet the new bugs are completely braindead, is also responsible for this
the state of wii homebrew today shows that broadon basically failed. just take a look at all these… the ones used for hacking the wii today are still a secret. team twiizers was effectively able to get ahead of broadtendo and stockpile exploits, and so the homebrew scene, from its inception with the tweezer attack, was able to remain relatively stable, with there being an untethered jailbreak that didn’t require certain games for all but around two years, and one requiring a certain game pretty much ever since feb 2008
the timeline of exploits and patches went like this. as usual, the hackmii blog is a good way of tracing the chronology, and i also like this thread. since i worked a lot of community history into this timeline, i’ve put it in its own chapter xD
4. wii hacking as it happened
- december 2007: tweezer attac; team twiizers discover trucha bug
- february 2008: team twiizers publish twilight hack; trucha is independently rediscovered and released twice, in a homebrew “trucha signer” program (27th) and datel’s “wii freeloader” (28th)
the twilight hack came about from reverse-engineering zelda: twilight princess (decrypted with the common key mentioned earlier), and finding a stack smash exploit from making epona’s name a lil too long… containing a program, in fact 😀… and putting that in a save-file, encrypted with another extracted key. it was the first and universal way to hack a wii for over a year, so is a name that’s still whispered in the wind to this day
- march 2008: nintendo teases IOS 37, with trucha fixed
datel is the company responsible for n64 gameshark and gamecube action replay, with a supreme aura as the only ones who’ve ever cracked the gamecube’s hardware disc encryption. this means one of the classic gamecube hacking methods has been the use of their “action replay disc” and “sd [card] media launcher”, with the unique property that you can run the disc and boot straight to homebrew, without requiring a game exploit (from an official disc) or a modchip; these three are genuinely still the only methods that exist for gamecube jailbreaking.
it’s a weird balance – selling cheap homebrew tools that still unlock gamecubes 20 years later, vs commercialising cutting-edge hacks to court the ire of nintendo. datel at least donated $1000 to team twiizers around this time, and never released tools that directly enabled piracy, rather region-freeing and modding games
no software uses this new IOS 37 (note btw that IOS versions are installed side-by-side to maintain compatibility with older games). indeed, it was published to nintendo’s update server and taken down soon after. but it was there. just to show they can. to intimidate datel. it hung around like a bad smell, triggering panic and pre-emptive homebrew patches that mostly broke wiis haha
datel’s release of the wii freeloader turned into a big blunder, since the trucha fix was ported over to the system menu’s IOS three months later. so all that’s left is 1-star reviews on amazon 🫡
i actually remember reading about this nonsense as it happened, on british teletext’s gamecentral
- april 2008: waninkoko releases an exploit that team twiizers showed him (the ES_Identify exploit discussed in chapter 5), in the form of a nand decryptor. the first pirated virtual console game shows up shortly afterwards. waninkoko also releases a tool for installing arbitrary (fake-signed) titles: the WAD Installer
team twiizers post thanks, waninkoko, a sequel to thank you, datel from the previous month, talking about the risks to the viability of homebrew caused by commercialising exploits or releasing exploits that readily enable piracy. twiizers’ decision to not release a wii hack based on trucha, in favour of the more robust and longer-to-develop twilight hack, is vindicated in coming months
another consequence of these developments was the epidemic of bricks in the coming months, due to installing incompatible system menu versions and homebrew packaged incorrectly as channels. bushing made it a life goal to figure out an all-purpose unbricking solution, and ended up getting somewhere with it with bootmii as boot2 released in 2009. the hackmii blog is full of interesting research into the wii factory process as a result
- may 2008: team twiizers releases the homebrew channel
thanks to the wii never (in any place, at any point in time) verifying that titles are signed on launch – only on install – the homebrew channel (hbc) has stuck around like an old friend, accessible via even an entirely unmodded system menu. a couple of later system menu updates deleted it, but an exploit could be used to put it back, and so it became the central hub for modders and speedrunners to use in decades to come
it was intended both as an exemplar design and a productive development platform, and passed both with flying colours. i’ve really enjoyed being able to send compiled programs over my local network from vscode/wsl terminal straight to hbc and have them instantly run. it’s so comfy
- june 2008: nintendo releases system menu 3.3, which botches an attempt at fixing the twilight hack, and fixes trucha in the IOS the system menu uses
of course, you can still install the homebrew channel and run unsigned apps or games by picking your favourite IOS version there
it also updated the “mini IOS” that runs in gamecube mode to fix the tweezer attack, despite dumping the keys being a one-time thing… in preparation for the release of korean wiis with a new common key called the “korean key”. but it later turned out korean wiis shipped with an unpatched mini IOS and indeed no gamecube support anyway ¯\_(ツ)_/¯
it mostly just turned into a kind of joke in wii modding, owing to every IOS versions being forked for korean wii and games only, and nintendo deciding in 2009 to add a check to the system menu that doesn’t just prevent it from booting on a wii that has/lacks the korean key (mismatched with the system menu’s region) but actually deliberately bricks the wii that tried to
so you often see in the tutorials of yore, sentences like DO NOT UNDER ANY CIRCUMSTANCES CHANGE REGION TO KOREA
- july 2008: bushing writes patchmii, an app that popularises the idea of downloading current versions of IOS and patching them to re-enable old exploits (here, trucha) to preserve homebrew support
the code for this, such as the famed bushing wii http library, is the basis of the majority of wii system homebrew, like custom IOS installers and verifiers, and has been passed down thru generations
team twiizers also discover that the wii disc drive can be enabled in an app to read arbitrary dvds by setting a bit in the app’s TMD – so there’s no gamecube-style hardware disc protection. they don’t disclose this and try to report it to nintendo instead, reasoning that it’s more useful for piracy than homebrew. nintendo responds by figuring out bushing’s name and work location and leaving him intimidating voicemails
- august 2008: homebrew developer crediar develops starfall (later preloader, then forked by DacoTaco into prilloader)
this builds on patchmii into a system menu patching and redirection utility, injecting a small loader before the system menu that was the first reliable and still most useful brick protection, and is installed as standard to this day
team twiizers releases dvdx, a hidden channel that grants access to dvd-r reading in supported apps. this method was intended as an obfuscation for the trivial tmd bit-setting method (which it itself used), which was still a secret, to gatekeep dvd-r access to apps like a video player rather than a burned-disc game loader
this tension between progress made in wii hacking and its application to “piracy” is a consistent thread here; i’m telling only the non-piracy story for now, so there’ll be a missing side to it i’ll fill in in a later chapter
- october 2008: nintendo pushes an update that patches trucha (and other exploits) in all versions of IOS*
* except factory-disc-only IOS16, which then gets set upon by game loaders
this means hbc and its installer have to switch to a new secret stockpiled exploit, now declassified as the stm release exploit. this allows for arbitrary code execution, and is used to patch the currently-running IOS to disable signature checks, so hbc installs as normal and launches apps as normal
to be clear, hacking a wii and running homebrew require arbitrary code execution on the cpu, as well as at the very least fake-signing on IOS, but ideally ACE there as well. this is why i speak of a jailbreak (for the cpu – twilight hack) and an IOS exploit (stm release)
updated wiis start to be manufactured around now. they had a fixed boot1 and a new motherboard revision (40) that demands less power, which slows down IOS, causing both old homebrew and revisions of IOS prior to this month to not work
-
november 2008: nintendo releases system menu 3.4, which botches fixing the twilight hack again
-
december 2008: the “wii fail” talk i’ve been referencing takes place (see chapter 1)
-
march 2009: nintendo releases system menu 4.0, which fixes the twilight hack (!) and stm release exploit. team twiizers pulls out another secret IOS exploit for installing/running homebrew, but there is no jailbreak for an unhacked wii, until…
-
april 2009: comex releases bannerbomb, the first game-free untethered wii jailbreak. nintendo of europe starts to extort money from customers who send homebrewed wiis in for repair
-
may 2009: team twiizers releases bootmii, the best brick protection for wiis that have a trucha-bugged boot1. they publish an open-source reimplementation of IOS known as MINI, and the source code of the twilight hack
-
june 2009: nintendo releases system menu 4.1, which changes nothing for new or existing homebrew installations 🤔
- august 2009: bushing discovers ahbprot backdoor, but its usefulness as an IOS exploit is not yet understood
- a wii jailbreak using smash brawl is also found by comex
- september 2009: nintendo releases system menu 4.2
- botches fixing bannerbomb
- successfully fixes IOS exploit used by the hackmii installer (which is how hbc and bootmii are now bundled); team twiizers pulls out another
- updates boot2, which overwrites bootmii (it can be reinstalled fine). nintendo’s boot2 updating code is poorly-tested and accidentally bricks several unmodified consoles. nintendo then tries to gaslight customers that they must’ve hacked their wiis
- intentionally bricks non-korean wiis that installed korean system menu
- installs crap in locations custom IOSes are usually installed to; trivially bypassed by first installing them elsewhere then using them to delete the crap
- auto-deletes homebrew channel and associated titles (team twiizers circumvents this by… changing their ids)
- team twiizers find a wii jailbreak using lego games, starting with indiana jones
- june 2010: nintendo releases system menu 4.3, rehashing 4.2 but properly fixing both bannerbomb and all of the hackmii installer’s exploits
- team twiizers exploitless for the first time since 2007. until…
- july 2010: hackmii installer with new secret exploit released. it still requires a game-based jailbreak however
- this installer is the first software i could find that uses the ahbprot backdoor discovered about a year prior, and its power starts to be understood. i’ll explain it in a sec
-
january 2011: wii jailbreak for lego batman released; lego return of the jedi follows in february. these are co-developed by team twiizers, lewurm and roto
- august 2011: team twiizers releases a new game-free wii jailbreak, letterbomb 📫. this was the standard jailbreak used until alternatives were released december 2018 onwards
✲✲✲
the ahbprot backdoor is really a design defect, similar to the bit that enables dvd-r reading. ahb means “advanced high-performance bus”, a feature of ARM processors. IOS has protection built in – “ahbprot” – that in practice isolates the cpu, on which homebrew runs, from direct hardware access. that isolation is the crux of the magic layer of security IOS provides that we first wondered about several chapters ago
turns out a bit in the software’s metadata (TMD) is all that’s needed to turn it off and have it run bare-metal like in gamecube mode. just like that
if anyone’s ever been frustrated by how if you make a strong API in your code, it makes it hard to test because you can’t just directly access the internal components, then you’ll feel for nintendo in their decision to backdoor their entire security system. i suppose it did take 3.5 years to fully figure out and take down
the whole security processor + IOS saga, from design to implementation, basically ends with this discovery
in practice, this means that hbc’s metadata has this bit set, so it starts with ahbprot turned off, which allows it to set a hardware register that disables MEM2 protection, letting it patch the currently-running IOS in memory. it then, i believe, patches the IOS-reloading process to preserve disabled ahbprot, so it can reload IOS into an app’s desired one and run the app. the app then patches in any exploits (like trucha) it needs. this process can be seen in this simple library and is the standard way to run apps with full hardware and root access today. this means that an installed custom IOS is only actually needed for custom drivers, such as high-bandwidth usb (*cough* usb 2.0) that actually works, as used by game loaders
i’m yet to find a good reason why it took a year for anyone to start using the ahbprot backdoor
✲✲✲
more jailbreaks and developments have happened since letterbomb – flashhax, str2hax and bluebomb, literally all found by FullMetal5 december 2018 onwards – but nintendo tapped out with system menu 4.3, despite not replacing the wii for another 2 years, and so the homebrew scene and best practices have been stable ever since. meanwhile, the 7.5 y/o switch got its 64th firmware update 2 months ago; how times have changed
5. broadway’s starlet
let’s talk about hardwar and softwar
the wii’s hardware and firmware design is in some senses a marvel and in others insane. it goes back to that design vs implementation conundrum. as a programmer working with a system that’s been cracked open, i can appreciate its elegance as an open system, if not a secure one
iop and ios
the wii comprises two processors: the embedded powerpc broadway cpu, and the ultra-embedded arm starlet co-processor. we’ve called it the security processor so far, but also discussed its role as an I/O bridge, mediating access between broadway and most of the rest of the hardware. it goes further than that, really – it runs the entire bootloader and is responsible for stopping and starting broadway, as well as itself. it’s the dominatrix
it was impressively concealed by nintendo, even from game devs, for a year until the tweezer attack. yet these days, it seems like everyone has to know about these pesky IOSes to get shit to work, and try to understand why the fuck there’s more than one of them
starlet was nicknamed thus cos it lives on the hollywood (gpu) die. its real name is input/output processor (IOP). its operating system is thus IOPOS, shortened to IOS (as in IOP OS… i give up). broadway doesn’t use an os, since it just executes games bare-metal as a single process, having not really moved on since the gamecube’s gekko cpu. indeed, the games have to statically link in nintendo sdk libraries that simulate os functions such as the home menu, as well as several drivers that were later ported to IOS i believe, which is part of what causes the backwards compatibility concerns between (not even gamecube but) new wii games and old wii games
this kind of nonsense results in major versions of IOS being frozen for games (for sdk versions specifically), and IOS being forked every time a new feature (such as usb 2) is added. this proliferation is partly what made it so slow for nintendo to release IOSes with patched exploits, and why it took a year for trucha to be fixed fixed. it also wastes a good bit of the 0.5GB flash storage, since each IOS is about 2MB, tho many do at least share space via a shared module system
each version of IOS has title ID 1-x, where x is the IOS (major version) number. that’s a pair of 32bit unsigned integers, the second of which is usually used for 4 ascii letters encoding the game ID (example: GMSP – “GameCube Mario Sunshine PAL”). boot2 has ID 1-1, the system menu 1-2, and IOSes from 1-3 to 1-255. 1-256 and 1-257 are used by BC and MIOS rsp. (see below)
booting
it also took nintendo a year to reprogram boot0 to use a boot1 with patched trucha bug, which is less explicable. to explain the secure bootstrapping process in full:
- boot0 is hardcoded into the hollywood chip’s rom. it’s about 1.3kB and its job is to read a fixed part (the first block) of the nand (flash) storage, decrypt the data there, hash and verify it against a hash programmed into hardware.
- boot1 lives in the first block of flash, but per the above, it cannot change. boot1 with trucha will thus keep it forever. it’s about 17kB, and its job is to initialise hardware, then load, decrypt and verify boot2 from a nand partition.
- boot2 is an IOS kernel, a few hundred kB in size, which parses the system menu’s title metadata, and decrypts and loads the IOS it requests. from this point onwards, hashes are not checked, so the IOSes can be anything. but if the system menu IOS is broken on vanilla boot2, the wii is bricked
- boot3 is another term for IOS (in boot context). it loads the system menu as it would load any other title, and is the first thing in the boot process to start broadway. it surprises me a lot that there’s no verification on any wii of what’s actually installed where the system menu should be. this is why the standard homebrew setup these days redirects the system menu to priiloader
gamecube mode looks very much like this as well. something triggers IOS to reload into “BC”, which is a modified version of boot1 that reboots the hardware into gamecube mode, then loads boot2 as normal. boot2 has a check for the lowered clock speed, whereupon it loads MIOS (“mini IOS”). unlike the system menu IOS in wii mode, boot2 is hardcoded to boot MIOS from title ID 1-257, so there can only be one MIOS, which is a pain for installing homebrew without polluting the system
synergy
this system where broadway and starlet are constantly rebooting is cool in a sense, cos the two almost function like threads in a threadpool. it’s also braindead in a sense. for example, to run a disc game, the system menu (on broadway) has to decrypt the disc’s TMD to pull out its desired IOS, and then reload IOP into that IOS. this kills all of IOP’s state, so it relies on broadway to reopen the disc and resend it the TMD with a ticket (a kind of license). if broadway is running homebrew then it can send those kinds of credentials to IOS at any time, representing a root-privileged title like the system menu (rather than a game, as that api is designed for). IOS then grants it root access to the filesystem for its troubles and, say, the homebrew can now dump any installed game in decrypted form and upload it to thepiratebay
this (the ES_Identify exploit) was found in march 2008ish and fixed the same year, idek how, but my point is this design just makes absolutely no sense from a security perspective
but from an open perspective, IOP is nice to have sitting there. it’s designed with a micro-kernel architecture, where the kernel is a marshaller of inter-process communication, where every user-space module has its own process, accessible using a /dev/proc (with a few paths per process) file api, much like in unix. broadway, as a process on a different chip, is mapped to a single process in IOS. a programmer typically opens and closes connections with each of these virtual files, and then uses a read/seek/write/ioctl/ioctlv api for messaging. ioctlv is some custom shit; looking it up on the web leads you back to the wii
the kernel is the most privileged module, and includes hardware-accelerated cryptography apis such as /dev/sha. (rsa is implemented in software… with disastrous consequences). the next most privileged is es (eTicket Services at /dev/es), which handles security, especially around title licenses (“tickets”) and installation. then there’re various aspects of hardware:
- fs for the nand (/dev/fs for the filesystem, /dev/flash for raw nand access)
- di for the disc drive (/dev/di)
- oh0/oh1/ehci for usb interfaces
and so on. ES is a pain to work with, as you kinda wish it weren’t there so the system could just have no security, yet you have to deal with signatures, certificate chains, ticket views and all sorts. such an extensive design, yet a trucha and ahbprot-backdoor-riddled implementation
system menu
for a system whose homebrew is as reliable as it is these days, the wii was always two steps from bricking cos of an extremely fragile system menu. an invalid banner (visual preview of a channel) would cause the entire menu to fail to boot. a region change would mess with the construction of the filepaths of the menu’s pages, which would throw up a 404 error, revealing, err, this
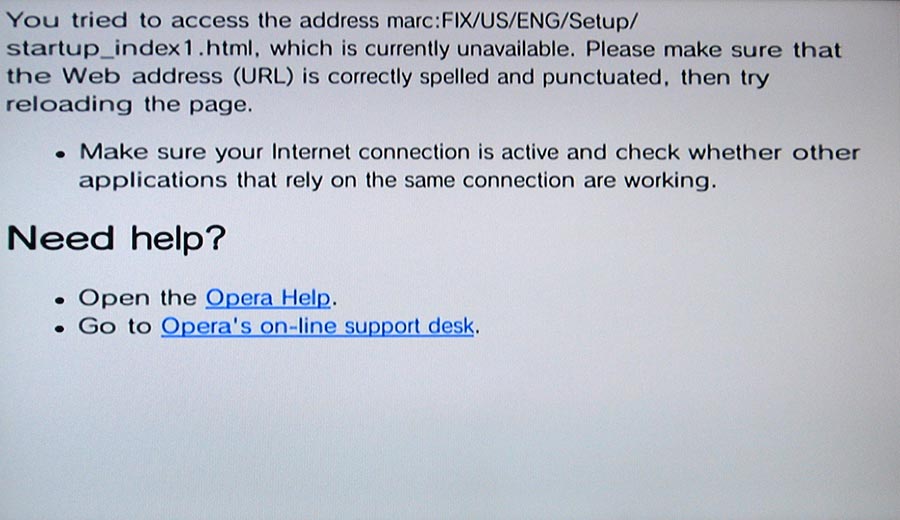
for such an innocuous-looking (and 🤪) error… little do they know, their wii is unrecoverable without a hardware nand flasher. and for what? the “US” in that example could’ve just been hard-coded because only one region of system menu can be installed at a time
fortunately, all system menu problems can be resolved using either bootmii as boot2 or priiloader; that’s part of the reason it’s so essential to have at least the latter start before the system menu. nonetheless, installing homebrew as channels (rather than hbc apps) and region-changing the wii are discouraged to this day.
a lot of speedrunning setups require specific video modes, and this used to often be achieved by changing all region settings without installing a matching system menu. this would cause a “semi-brick”, where the system menu settings would give the 404 error, which is a sus and unstable state to leave the wii in. these days, i recommend to pester the devs of e.g. priiloader to actually fix video mode issues, and as a last resort, region-change only ever the video mode
6. gigaleak
the first of a couple of sections on ethics. BroadOn is known not only for applying heinous security flaws directly to the forehead; it was also the victim of the first of the nintendo gigaleaks, originating from a server breach in 2018. i believe it’s understood now that nintendo was the compromised party, so this is more a joke than anything, but it’s true that the first (i suppose, non-pokémon-related) leak was the hardware and software source code for BroadOn’s ique player and for wii IOS and its boot0/1/2/MIOS variants. it was all released in may 2020
this 2018 breach was performed by english autist zammis clark, who committed a string of massive data breaches from his family home in bracknell (a town known in my head as “where the green line bus goes”), breaching nintendo while on police bail for breaching microsoft, and being spared jail over a defence of being unable to help himself. presumably, with his internet access closely spied on for the rest of his life lol
the nintendo gigaleaks are renowned for their unprecedented scale, with tens of gigabytes of confidential data leaked, and some still leaking in 2024. it’s mostly pokémon related, with also a good bit of hardware info, and source code and concepts for older games. i think many will remember seeing bits and pieces of old nintendo concept art going around twitter during the covid pandemic, or the smw soundtrack reconstructed from the original samples
it can come as a surprise to learn that this leaked source code is literally useless for emulators and other reverse-engineered programs, as used in homebrew – for legal reasons. this is a great introduction to the topic. i’ve seen george harrison’s my sweet lord copyright case cited on homebrew forums as a primer on how intellectual property works; even if you’re exposed to something and unwittingly recreate it without consciously realising, you’re liable under copyright. dolphin emulator said, regarding the leaks, that any contact with such material would lead to the shutdown of the entire project. the precedent is kinda there with nintendo taking out emulators for its current platforms, yuzu and citra, in a $2,400,000 settlement this year. in this case, the argument was a copyright assertion over the enc/decryption keys, which this article has been all about…
*cough* ebe42a225e8593e448d9c5457381aaf7
i feel like this idea of intellectual contamination is about living a lie in a sense. it reflects a deeper flaw in the concept of intellectual property, of how high-tech products are sold to consumers. this has always legally been stacked in favour of capitalism, with 200-year copyright terms, a lack of ownership of the same thing in different formats, and the freedom of companies to enforce arbitrary ToS despite taking money from consumers. but de facto, it ends up in a mass of blurred lines, with every party bringing their own code of ethics, and a company losing money compared to de jure, and responding with aggro
morally, it’s really hard for me to imagine that if i own a computer, i can’t do whatever i want with it. in the case of source code leaks, i would have knowledge, which someone else is liable for stealing, that helps me solve a puzzle that i could still progress on without the source code. a project like dolphin ends up wasting years from having to avoid this, and it feels like it’s impossible to actually steer clear of the consequences of information that shouldn’t be out being shared. info always influences communication, knowledge, subconscious biases… so it’s about if you can be caught out on it
i suppose the main thing is that shorter copyright terms, and especially forced source code disclosure (as if after a patent expiry), would help to neutralise this dissonance more quickly. but there’s also something fundamentally wrong with treating technological progress as private property. like it should be possible to reward nintendo’s creation while freely building upon it, but the economic system for that just doesn’t exist
on a personal level, it’s also interesting thinking about the level of plausing that people do to balance zammis-like compulsive morbid curiosity (who wouldn’t want to read the solution to the puzzle?) with a desire to participate in gold-standard clean-room projects like dolphin. it’s all to do with what level of bushing-style double-life you can lead, what faces you can present. and i’m coming to understand that humans are very well adapted to that
7. el otro lado
when it comes to video game piracy, i find it easier to get behind the idea of creative IP. i don’t think games consoles can be considered creative works. they’re not art; they shouldn’t be used as a battleground for companies to win profits over each other. they’re just computers. there would ideally only be one games console to buy. but games are clearly creative works – aggregates of visuals, sounds and stories. and these are the end-consumables for users, what they’re here for, so it makes sense to me to have them monetised in a similar way to how they are now
except… i think this should expire after 10–20 years and art should become free. not 200 years lmao. the personal ethical code of the reader, like the one i just set out, affects how we view the history of wii piracy/warez, especially now vs back then. these days, it’s hard to even perceive a difference between homebrew-oriented software and “piracy”-oriented software. most people, including the standard wii homebrew guide, don’t distinguish between them. their devs get along well with each other and form a community with split ethics. you can only really get a feel for anti-piracy ethics from talking to old-heads from team twiizers or devkitpro (the homebrew developer toolchain). but back then, it was a different story
✲✲✲
let’s resume the history of “piracy”. i’ll keep this shorter cos, well, you’ll see. the best reference for this topic is this post
april 2008 is loosely where this story begins, with the “thanks, waninkoko” hackmii article i mentioned in the previous timeline. one thing that sends me is the classic “i liked this tweet by accident” jk rowling defence that waninkoko tried to pull; it feels like those moments of anakin before… y’know. let’s see
later in april, bushing writes “vc piracy has (as expected flourished)”, and it’s a theme of tracking piracy that, owing both to its level of illegality and the comparative incompetence of pirates as compared to hacking groups, it’s hard to track its exact history. it’s mostly unimportant to be fair
the next thing to note is probably patchmii in july, which, particularly in hindsight, feels like it flies very close to the sun wrt team twiizers’ goal of suppressing piracy while enabling homebrew. the methodology for piracy was established by the idea of patchmii, whose important steps i’ll quote:
- Download the ticket and TMD for IOS37 [the latest IOS] from the Nintendo Update Server; using the TMD, download all of the encrypted contents from NUS
- Decrypt each content individually, look for versioning tags inside the binaries and display them
- Look for the signature check [trucha], and patch it out.
- Re-encrypt the contents; recompute the hashes, modify the TMD.
- Modify the title ID in the TMD and ticket to IOS5.
- Fakesign the TMD and ticket.
- Install this patched IOS37 as IOS5.
reminder: the nand has a folder for each major IOS version, so we’re talking about installing a major version, with patches, to replace a different major version (IOS5 doesn’t otherwise exist; the convention of installing custom IOSes to IOS2xx started very shortly after in patchmii)
in july 2008, bushing implies that patchmii is being used to package “cIOS” – custom IOS. if you look around this period, you find a lineage of stuff like “cIOS 36”, then “cIOS 236”, then cIOSX, then d2x… etc. etc.. similarly to waninkoko’s wad manager appearing as a result of an exploit team twiizers shared with him, waninkoko’s “cIOS installer” appeared shortly after patchmii. team twiizers often arrogantly emphasised that waninkoko’s creations trivially repackaged their work. but of course, there’s a difference between the patchmii dev framework that nobody knew how to use, and the cIOS installer
one thing i like about waninkoko’s products (the older ones…) is that they do what they say on the tin. their code is (sometimes) nice and clear – not clever, forged by original reverse engineering worthy of the Gods of the Stature of team Twiizers. but simply, well-designed programs that (at the time) prioritised good user experience. hence, his wad manager and cIOS installer survive to this day as YAWMME and d2x cIOS, both of which are recommended standard apps for everyone to use
in september 2008, homebrew dev mega man published the first custom MIOS and “gamecube homebrew launcher”. as someone working at the forefront of pal speedrunners’ needs, to get 480p working in gamecube mode, eir work on this is something i am building on today, and the goal is clean enuff that even team twiizers would approve. cMIOS is, owing to the restriction of boot2 booting MIOS from a hard-coded location i mentioned earlier, the only way to get gamecube homebrew to boot on a wii besides the old drive modchip method. homebrew. not game launchers. (but also game launchers)
in the end, Swiss is the only gamecube homebrew capable of forcing 480p on an official disc… and it applies this to sd card loading, which we use with our practice isos to play different-region copies of our disc game, or simply to spare our disc drive from wearing out. but i mean, i speedrun sm64 on my wii despite having never bought it, so i’m not trying to imply i myself am not sometimes a pirate, but rather to contextualise the competing views and community dynamics
in october 2008, wii piracy kicked into top gear as a result of a leaked release of a “backup launcher” waninkoko had made. the technology is a combination of the cIOS method described earlier and team twiizers’ dvdx (from august 2008). if you remember, dvdx tried, in a very complicated way, to gatekeep a really simple backdoor that enabled the wii to read burned dvds. they tried to enable that for a video player, and waninkoko deciphered their obfuscation just enuff to use it for a burned wii game disc reader
(it’s funny that for a few years, the end-goal of wii homebrew for most people was playing games from burned discs, rather than from usb drives as today. sign of the times haha)
the history thread pinpoints this as the start of a massive drama, borne of the conflict between the hackers and pirates, but also channeling the inherent instability of groups that pride themselves on making other people’s copyrighted works freely or selectively available
the work by waninkoko was continued by wiigator and later by wiipower. it is indeed wiigator’s cMIOS, developed from mega man’s, that pal speedrunners have relied on for the past 13 years. to wiigator, it was simply a crucial component for his “gamecube backup launcher”. bear in mind, the term “backup” is often used in video game piracy as a euphemism for a copy, whether made from one’s own disc or downloaded from the internet. gamecube backup launcher was created in early 2009, following on from (wii) backup launcher of october 2008 mentioned above
backup launcher 0.3 was released with the name “gamma”, which was picked up by wiipower and became the culmination of the old disc-loading projects: NeoGamma (releases made june 2009 – january 2012). the gamecube cMIOS side was developed into a cMIOS family called DIOS MIOS (march 2012 – jul 2014), followed by Devolution in summer 2012, which innovated the ability to load gamecube games outside of gamecube mode and MIOS. this comes at the cost of accuracy, and so has been a bad solution for speedrunners, who’ve stuck to Swiss in situations where vanilla behaviour is insufficient (like 480p on PAL). Devolution was encumbered by an anti-piracy verification requirement, wherein users had to insert a disc once to gain the ability to load their games from removable storage. This meant its source code was never released, and led to it fading to obscurity, obsoleted by Nintendont around early 2014, which remains the go-to for gamecube game loading (open-source, and also not using gamecube mode or MIOS)
in march 2009, waninkoko released the first usb loader, shortly after a homebrew usb 2.0 driver was made. marcan’s commentary, wherein he tries to recreate a usb loader from available homebrew tools as fast as possible, is very insightful for this period. we learn a few interesting things:
- that marcan got the whole thing working in 6 hours, emphasising the fragility of non-piracy homebrew and the thin line needed to be crossed to use it for piracy
- that waninkoko had started bundling ads and spam in his software, and targeting the piracy market (hence me comparing him to jk rowling earlier)
- that the piracy market seems to dwarf the rest of wii homebrew, looking at the server outage caused by his “big reveal”
[marcan:] Teknoconsolas administrator Xtreme, who doesn’t seem to like me that much, started firing shots using a cheesy music literature reference where Waninkoko is Mozart and I’m Salieri. Insults galore, apparently I’m now a “wannabe waninkoko”. Though the analogy kind of breaks down when you consider that I’m responsible for walking Waninkoko through his beginnings on the Wii scene (and boy do I regret that).
if jk rowling’s first experience of transgenderism had been being walked thru it by a trans person, then the analogy would be complete. point being, ideology is fragile. there’s little that team twiizers could’ve done here to project their way of thinking onto waninkoko and prevent the rise of the piracy movement, since the ideological distinction they make is ultimately a thin one, and that’ll be reflected in marcan’s increasing ranting and even bushing’s deteriorating outlook on the situation. in both situations, there can be no doubt that the dark side had a hugely negative effect. the question is, was it inevitable?
waninkoko’s usb loader later had a frontend added to it and became usbloader gx. there’s also configurable usb loader (what a dumb name) and wiiflow. but the details of these apps are unimportant and it’s a struggle to find their timelines anyway. it’s interesting to note that this lineage of software that tip-toes in maybe being ethical and maybe not has been the biggest source of drama in wii modding to this day
✲✲✲
a funny thing that arose from mostly the piracy scene is the concept of like, an all-in-one hack that lets you play All The Gamez. with the situation on the ground constantly changing between new hacking discoveries and nintendo’s countermeasures, homebrew setups required a lot of careful planning and maintenance in order to not break consoles – something like team twiizers’ approach. these all-in-one hacks were, of course, anything but; they were produced with instant gratification and popularity in mind. but of course, once they’re out, they’re out forever
one such hack was cIOSCORP, later DarkCORP, which hacked every IOS to enable things like the trucha bug, with the idealistic rationale that no matter what IOS version a game asked for, it’d be hacked and ready to go. in practice, it turned into a situation referred to as cIOSPAGHETTI, messing up IOSes badly enuff that the hackmii installer often couldn’t find a vulnerability to exploit
some [homebrew update] packs are made of fail
a name that still causes shudders to this day is pimpmywii. chosen by lifewire as one of the 5 essential wii homebrew applications, pimpmywii wrangles IOSes in a fully-automated, chaotic and unpredictable way that, with the passing of time, has started to break the wiis of the noobs it’s targeted towards. it has become entrenched in video guides produced by ignorant youtubers, leading to situations like this
the ocarina of time speedrunning community got caught with its pants down when an old video guide it produced in 2017 (and possibly more guides from before then) used pimpmywii to do assorted wii hacks :3. the video fittingly mashes A thruout the whole app. this led to IOS9 being overwritten by a hacked version of IOS60, which sped up every game reset by 1.8s. the amount of research it took to diagnose this contrasts starkly with the carelessness with which pimpmywii was thought out, a case of one error propagating into, well, speedrunner setup spaghetti. and the ocarina of time community, traumatised to this day, asks you to make doubly sure you install an official IOS9 as part of your homebrew setup :)
things have been converging, decades on, onto standardised best practices. unfortunately, the wii hacking scene has lost most of its talent, since hacking cutting-edge tech is much more alluring to them than laying the foundations of quality software to last a lifetime
8. the love triangle
michael steil of xbox/xbox 360 modding makes a plaintive cameo in team twiizers’ wii fail talk, explaining, in the hackers’ own words, the intentions of their hacking, and the eventual outcomes regarding piracy (you can read his slide on marcan’s website; linked somewhere earlier). he comes to an idealistic conclusion befitting the times. in december 2008, the one console that hadn’t been hacked was the one that offered users the ability to run their own operating system on it. say hello to the ps3’s “other os” feature :D. except…
someone started hacking it anyway, sony removed the feature in response, and then the ps3 was busted wide open – partly by fail0verflow, which is what team twiizers renamed themselves to as they moved onto new consoles
michael’s point kind of makes sense, in that there’s less demand to hack a more open console. the ps3 was piracy-free for 3 years. but it belies the scale of the demand for piracy (the whole-ass market that exists for monetising it), and the kind-of unstable equilibrium that the article about the ps3 i link alludes to. hacker attacks “open” platform’s feature that makes it more open, said feature is removed, which motivates more “ethical” hackers to attack the closed platform, then it gets busted into an omega-open platform. this kinda thing
you may have noticed that the intensity with which nintendo started cracking down on wii hacking in 2009 matched the explosion of piracy in that october 2008 – march 2009 (and beyond) period. citing team twiizers’ own words, we have a few articles that go into more depth on this hacker/pirate/manufacturer triangle:
- pandora’s xbox – matthew braga, 2010/01/20
- a new direction for homebrew console hackers – nate lawson, 2010/05/11
- of homebrew and antipiracy – ben “bushing” byer, 2010/05/15
the extents team twiizers went to to stall piracy start to make sense now. but hindsight renders it, i guess, futile?
not just because wii homebrew works as a united front these days where everyone has the tools and freedom to do as they please. but also because, starting with that other os saga, it feels to me like the hackers’ position is built on matchsticks
if you asked me about music piracy, i wouldn’t be nearly as sympathetic to the outlooks of byer and steil as i am here. the stories of oink’s pink palace (which i closely followed at the tender age of 12), repeated 9 years later with what.cd, show that music is fundamentally incompatible with capitalism. the natural outcome of this has been the removal of drm everywhere and the opening up of spotify (and clones) on a freemium model that fundamentally respects, what i would argue is a right, for people to hear, be inspired by, and build upon, the history of the music of the world. music, conceptually, is free, because it’s an evolution of the ideas of songs and traditions. and so, monetisation has (finally) evolved to (somewhat) respect that (i say “somewhat” – steal from spotify and reinvest it into bandcamp !!! their revenue shares are just not equitable at all for underground music)
video games have so many moving parts that it does feel harmful to apply the model of music to them directly. as i said earlier, i think the model of short-term copyright does what we want it to do. for example, people buy wii games 2006–2012, buy them second-hand or as downloadables 2012–2017 (same as i did my gamecube games as a kid), and then they’re made free. them being free doesn’t mean ethically we shouldn’t buy them; i would argue for buying lifetime licenses to games. as with being forced to re-buy californication on vinyl in 2012 cos the original cd’s master was aids, nintendo selling mario 3d all-stars for £50 is abusive. i never fell for this myself, but between their attitude towards smash and them refusing to refund £7 they took for me against their own refund policy for an online service i didn’t ask for, i am quite keen to never give them money again
in that respect, i think team twiizers’ attitude was commendable at the time. the ps3 being more open and so not pirated for 3 years is a great thing. i think people still having that attitude now for the wii makes less sense. ultimately, it’s a question of personal responsibility; the case of the cMIOS i mentioned is a great example. the technology for it would’ve been considered “for piracy” by twiizers, but speedrunners need it for a use twiizers would consider legitimate. it’s our job as users to figure out where we draw the line – do we buy a copy of every version of SMS we need and only run it off disc? do we do this and run copies off an sd card? do we only buy one and pirate the rest? or do we pirate the game full-stop?
for me it’s the third one and the fourth if i hate the company. to each their own. it’s interesting that, for example, one of the current faces of fail0verflow is prominent dolphin developer delroth, yet dolphin, by its nature, is a “backup” loader. there’s no possible use of it that doesn’t involve making a copy of a game. and the concept that copying is ok but sharing copies isn’t is only legally valid in the usa (in the uk, both are illegal). emulators (and most speedrunning communities for example – notable exception ocarina of time 💀) take the ethical stance that they enable reverse engineering and playing copies of games you own on a different platform, and it’s the user’s choice how to handle that. team twiizers would just call this a warez loader and talk down to them. dolphin was challenged by nintendo (and so was banned from steam) off their bundling of encryption keys. team twiizers, for all their efforts, were getting intimidated and patched by nintendo
cos it is all ethical matchsticks. the idea that a secure platform would be happy with exploits enabling homebrew makes no sense; fail0verflow keeps wii exploits secret to this day, chiefly from nintendo since the wii is already fully open for piracy. the success of their ethical direction from console to console is summarised by marcan here, and tho i haven’t kept up enuff to know how well their ps4 linux project went, i do see a pattern of an inevitable fight against the tide in here
wii homebrew in 2024 is, at least, a bring-your-own-ethics kind of situation, and that enables us to freely automate things and be productive as speedrunners, wherever we got our copies of the game from. we need our practice hacks and our 480p (and to be fair, nintendo disabling 480p on gamecube for europeans only has to be one of the most abusive things they’ve ever done)
and this is why i’ve mostly referred to piracy with quotation marks before this chapter. life is… ethics are… subjective best-effort. if we dig a little deeper then it becomes highly questionable in most cases that white people are living in america. go further and it’s time to start considering the supremacist attitude humans have over other animals. ultimately, your life is ethically a best-effort, shaped more fundamentally by your role in the survival of the fittest
9. gc forever
i wanted to end with a bit of a state-of-the-art of wii hacking today. ironically tho, i wanna start with the gamecube, because that’s what i’ve been by far the most impressed by
gamecube today
[me:] the nintendont approach is very cool as well. in fact it was almost too cool, so ppl weren’t hungry enuff to fix the code, bugs or just maintain it decently. gamecube homebrew is like the powerful art of the tortured artist who melted several motherboards with botched solder jobs
the march towards open-source hardware, schematics on github and commodity components straight from the chinese sheds via aliexpress, has led to such breakthrus as the ms2131 (good-quality usb-3 hdmi capture card for £8, released in 2022/3). gamecube hardware mods have taken a similar direction. if you recall, the only options for gamecube jailbreaks are datel’s out-of-print action replay disc, exploits in games that require hacked game saves made on wiis or bought from ebay, or modchips. the two modchips shaking up the game these days are:
- picoboot by webhdx – a 2022 soldered mod involving a vanilla £5 raspberry pi pico (i.e. entirely commodity open-source components)
- flippydrive by team offbroadway (if u get the reference then you’re a diligent reader c:) – a 2024 solderless (!) mod (wedging a flex cable between the disc drive and motherboard :o) involving a bespoke, cheapish (~£45), chip
in the same way that the wii has been endgame for hacking for a decade, resulting in ppl putting their energy into flaming each other over nintendo wifi and wii-shop-channel resurrections, the locked-down-ness of the gamecube, with its lack of exploitable surface area, has kept people hungry. the quality of the hardware projects passes down into the software, too
i’ve mentioned swiss, the swiss-army-knife of gamecube homebrew, as the only way of booting european gamecube games in 480p, thanks to its sophisticated patching technology. the question is, then, why is there no wii project that can do that? it is partly explained by how locked-down the MIOS is, as i went into earlier, but also partly by the fact that it has been continuously maintained by emu_kidid and especially extrems, much more than any wii project. swiss’s patching code, since even 2012, uses this full-on lexer thing to read the assembly code of functions, fingerprint them based on how many loads, stores, branches etc. they do, and then efficiently apply a squillion patches. by contrast, most wii patchers i’ve seen are running in O(nk) time (n = size of exe to patch, k = number of patches) lol
extrems is the kind of person to throw out 200 commits in a year and document none of them. the swiss patcher.c file is now 17,000 lines long (and that’s without most of the actual patches…). i do appreciate eir competence and knowledgeability a lot, tho, and am very happy with the design, reliability and caretaking of swiss
(shame about the cmios)
with picoboot, flippydrive, swiss, the new menu interface offbroadway is developing, and novenary’s gekkoboot program with its efficient button-mapped homebrew-booting interface, project quality has been high and there’s an energy, interestingly, that 2024 is the year of the gamecube, that its scene has never been this productive
the clue is in the name of their forum, https://gc-forever.com/. and they’re deadly serious about that 😎
wii today
by contrast with swiss, you get the vibe about nintendont that nobody ever cared to make it accurate, only convenient, and it cannot force 480p on some games despite not even using the cmios and instead running games in wii mode. this makes them load faster than on the wii’s disc channel, and it also has novel glitches related to register pollution. overall then, it kinda functions as a cheap emulator in comparison to swiss. the codebase, i’m told, is terrifying. it’s had periods of not being updated for a whole year, and updates mostly add support for random controllers like dualshocks
generally speaking, wii projects have been enduring being forked repeatedly without much regard for integrating changes properly, and have been accumulating cruft. the quality of the new code has been pretty good, if not close to the level of the gamecube projects. so the biggest problem has rather been amateurish development practices. an example i can give is that the best wad-installation library is squirreled away integrated into a branch of a separate program – the dev cited a fear of not wanting to be seen as competing with other projects, saying this in the same discord of the broader collective of projects, including the would-be competitor project, which this same dev also currently maintains. this kind of energy of secrecy and competition seems to be missing from the gamecube scene, tho admittedly my sample for that is just extrems’ discord so maybe not representative
of the wii projects, i think priiloader is in a pretty good state, and likewise the library that everyone uses to interface with the gamecube and wii hardware (for example, IOS), known as libogc and started in 2003 by shagkur, has also been pretty good. the library is maintained by wintermute, who has gained a reputation for harassing developers who deviate form his (very) narrow view of how his tools should be used (this thread gets into the issue). the most notable outcome of this is that extrems maintains a permanent fork called libogc2, and has taken a hard line towards reintegrating this for unknown reasons. a tale of two very stubborn people who are unable to work with each other… and struggle with anyone else for that matter :P. libogc2 is, as you might guess, better maintained and with an even lower documentation-to-code ratio
i will give a shout-out to xflak for the modmii project, which has been an extensive user-facing wii modding tutorial framework from the early days of wii modding, and now also hosts and organises the stable of currently-recommended user applications and active wii homebrew devs. i am glad to join them
i will also give a passing shout-out to my own software stable, which is intended as a totally communal project producing standard libraries and, maybe one day, system applications. by totally communal, i mean i assert zero ownership over the sofware and its direction is determined by direct democracy of stakeholders. check out the template project if you’re interested in making some programs for the wii :)
idk a huge amount about this stuff, but it’s also worth noting the wii resurrection projects that have been around. i’m particularly impressed by wiimm’s work the wit romhack patcher, commonly used for new randomiser projects, and the wiimmfi online play network. vega’s wii assembly tutorials are a true marvel, and i also think ctgp is sick
hey! i hope you enjoyed my deep-dive into wii hacking ^ - ^